
ngrok is a popular tool for creating secure tunnels, exposing internal Kubernetes services to ops teams and developers, without complicating configurations.
This blog shows how to install the ngrok Kubernetes operator with Spectro Cloud Palette.
Common challenges in accessing Kubernetes services securely
By design, Kubernetes prioritizes internal communication, keeping its services encapsulated within the cluster for security and scalability.
While this makes sense for production environments, it creates challenges in specific scenarios, such as debugging, testing, or granting temporary access to external users. Issues include:
- Complex port forwarding: Setting up port-forwarding rules to expose internal services is cumbersome and often temporary, requiring constant reconfiguration.
- Ingress configuration overhead: Deploying and managing ingress controllers, load balancers, and public IPs for secure access can be resource-intensive.
- Risk of overexposure: Exposing services directly to the internet without proper restrictions increases the risk of unauthorized access or attacks.
- Certificate management: Ensuring secure communication often requires handling SSL/TLS certificates, which adds complexity to the setup.
How ngrok simplifies secure access

Enter ngrok, a tool that takes the hassle out of exposing Kubernetes services. With a simple command or manifest, ngrok creates secure tunnels between your chosen endpoint and local services. It offers:
- Instant tunnels: No need to configure ingress controllers or load balancers — ngrok provides a public URL that maps directly to your internal service.
- Built-in security: Every ngrok tunnel is secured with HTTPS, removing the need for manual certificate handling.
- Authentication and access control: Ngrok allows you to restrict access to your services using OAuth, SAML, OIDC with multiple identity providers, IP policies and more.
- Ease of use: Its user-friendly CLI and dashboard make it accessible even to those unfamiliar with complex networking.
Deploying ngrok with Palette
Here are the tools and configurations you’ll need to get started with ngrok:
- Palette account: We will be using Palette to deploy all resources, so you will need access to a Palette account. If you don’t already have one, set up a meeting with us to get started.
- Kubernetes cluster: A Palette-provisioned Kubernetes cluster or an imported local machine (e.g., using Minikube, Kind, or K3s) or managed EKS, AKS or GKE cluster.
- ngrok account: A free or paid ngrok account to securely expose Kubernetes services.
Configuring your ngrok account
Before diving into deploying the ngrok resources, we will need the following essentials prepared:
- ngrok API key: A unique key required to authenticate and interact with your ngrok account programmatically.
- Auth token: Your ngrok authentication token, used to configure the command line interface and secure your tunnels.
- Domain: A free random ngrok domain or a custom domain if you plan to use ngrok’s reserved or branded URLs.
Let’s start with the API key. Go to your ngrok dashboard (https://dashboard.ngrok.com/), select API Keys under Identity & Access and then Create API Key.

Add a description for your key and select Add API Key.

After selecting Add API Key, the key will be shown on screen. Make sure to copy the key and paste it into a notepad. If you lose your key, you will need to create a new one — it’s only shown once.

Now let’s get your Auth token. Select Your Authtoken under Getting Started and copy the listed token. Store this in your notepad as well.

Lastly, let’s create your (free) domain. Select Domains, under Universal Gateway and select Create Domain.

You can close the initial screen that pops up, as we won’t be using the ngrok CLI to set the domain.

At this point, you should see a screen with a unique, randomly generated domain provided by ngrok’s free plan. This allows you to expose services at no cost but comes with limitations like randomized domains for each session, and rate limits on requests and connections. Make sure to copy and paste this into your notepad as well.

Create an addon profile for your ngrok resources
Now that you’ve gathered your API key, Authentication token and domain, let’s create a Cluster Profile in Palette for the necessary ngrok resources. In order for us to use the latest ngrok Kubernetes Ingress Controller, let’s add the ngrok Helm chart repository to Palette.
Adding Helm registries
We can add Helm registries in the Tenant Admin project -> Tenant Settings -> Registries -> Add New Helm Registry

Fill in a name, add the https://charts.ngrok.com chart endpoint and click Confirm (everything else can stay as default).

After adding the registry, the Last Synced status will be “Sync in progress”. Make sure to wait for that to change to a date and time. The sync will then be complete and you can create your addon profile.

Creating macros
Before we create the Cluster Profile, let’s create three macros. Macros allow us to define key value pairs on a Project or Tenant Admin level, which can then be used with placeholder variables in our Cluster Profile layers.
These macros make it a lot easier to update variables across multiple running clusters and allow the users to add their own custom values, which will only apply to resources deployed in their project, or inherit org level values set by an admin.
To create the macros, go to Project Settings, open the Platform tab and select Macros. Now add the macros listed below, with your personal ngrok info. You can select Add New Macros to… add more macros. Don’t forget to select Save changes when you’re done.
- NGROK_AUTHTOKEN
Add your authentication token as value - NGROK_APIKEY
Add your API key as value (no need to worry about mine, it will be long gone by the time you read this 🙂) - NGROK_DOMAIN
Add your domain as value

Creating Cluster Profiles
Now that we have our macros defined, let’s create the Cluster Profile. Cluster Profiles can be made visible from only within a project or across all projects.
In my case, I’ve deployed a cluster in an Ngrok Demo project, so I’ll create the Cluster Profile there as well. This way, the profile will only be visible to users that have access to this project. To make your profile visible across all Projects, create it in the Tenant Admin project.
Create your profile by making sure you’re in the right project, going to the Profiles tab and selecting Add Cluster Profile.

Add a name and select Add-on as the type. Full and Infrastructure will guide you through the infrastructure layers first and are infrastructure specific. Add-on Cluster Profiles can be mixed and matched with any full or infrastructure Cluster Profile, so they can be applied to any Palette provisioned or imported cluster.

We can now select the type of resource to add as a layer in the Cluster Profile. Since we added the ngrok Helm registry, we can select Add Helm chart and then Public packs.

It might take a minute for all the Bitnami charts to load, so it’s faster to select your chart registry from the dropdown. After selecting the ngrok registry, select the kubernetes-ingress-controller chart, as this will contain the latest Helm chart provided by ngrok.

When adding charts this way, we download the values.yaml from the provider and they typically need some configuration before they can be deployed. In our case, we need to add the namespace, authtoken and API key.
Your values.yaml might look a bit different because I’ve removed a bunch of comments, so I could fit the necessary fields in the screenshot. I’ve also set the fullnameOverride, so the deployed resources don’t get extra long names.
For the authtoken and the API key, we need to set the variable definitions for the macros we’ve configured. After creating a macro, you can use “{{ .spectro. }}” to find all available macros (from within your project), when editing a cluster profiles layers.
After you’ve configured the values.yaml, select Confirm & Create to save your configuration.

The values I’ve set:
namespace: "ngrok-system"
fullnameOverride: "ngrok"
apiKey: "{{ .spectro.macro.NGROK_APIKEY }}"
authtoken: "{{ .spectro.macro.NGROK_AUTHTOKEN }}"
Now that we’ve created our first layer, let’s add the other manifests needed to run a test application and the services needed to connect it to ngrok and expose the test app. We’ll be adding raw YAML, so select Add Manifest to do so.

Add a name for the layer and then select New manifest, to add an empty YAML file where we’ll add all the necessary resources.

Add a name for the manifest and select the checkmark when you want to save it and add content to the manifest.

Feel free to copy the contents of the YAML below. You can find it on the ngrok Kubernetes guide as well. I’ve just replaced the tabs with spaces and I’ve added the NGROK_DOMAIN macro. If you copy YAML that’s incorrectly formatted, you will be notified in the YAML editor.
apiVersion: v1
kind: Service
metadata:
 name: game-2048
spec:
 ports:
   - name: http
     port: 80
     targetPort: 80
 selector:
   app: game-2048
 type: ClusterIP # Optional, default is ClusterIP
---
apiVersion: apps/v1
kind: Deployment
metadata:
 name: game-2048
spec:
 replicas: 1
 selector:
   matchLabels:
     app: game-2048
 template:
   metadata:  # Corrected indentation
     labels:
       app: game-2048
   spec:
     containers:
       - name: backend
         image: alexwhen/docker-2048
         ports:
           - name: http
             containerPort: 80
---
apiVersion: networking.k8s.io/v1
kind: Ingress
metadata:
 name: game-2048
spec:
 ingressClassName: ngrok
 rules:
   - host: "{{ .spectro.macro.NGROK_DOMAIN }}"
     http:
       paths:
         - path: /
           pathType: Prefix
           backend:
             service:
               name: game-2048
               port:
                 number: 80
Make sure to also change the Install order from 0 to 1. The first layer has 0 as its order, so both layers would be deployed in parallel. However, the demo app might need ngrok-specific custom resource definitions, so it’s best to deploy that after the first layer has completed. Select Confirm Updates when you’re done with the configuration.

Now that we have our two layers configured for this Cluster Profile, select Next.

If all looks good, select Finish Configuration to create the profile.

Deploy your Cluster Profile
Now that we have our profile configured, let’s deploy it to a cluster. For this, you will have to use a cluster you’ve provisioned or one you’ve imported.
Select your cluster, go to the Profile tab and select the + button, as seen in the screenshot.

Select your ngrok_addons profile and select Confirm.

Your profile is now listed with the other profiles, but you will need to select Save to actually apply it. You could make some last minute changes to the manifests, before applying the profile, hence the extra step of saving the shown configuration.

After saving the profile, you can wait for the new resources to be applied. If nothing fails, the new profile should be quick to spin up and you should see a game-2048 service, a simple web application, pop-up in the Services field.

Accessing exposed services
You can now also go back to your ngrok dashboard and check if an Edge endpoint has been added to the Edges tab under Universal Gateway.

Select the endpoint and check the tunnel status and backend configuration. That should look similar to the screenshot below. This tells us that our back end is correctly pointing to the game app and that the tunnel is active.

Now let’s open our test application. You can do this by either copy-pasting the domain to your browser, or by going to Palette and selecting the exposed port 80, next to the game-2048 service.

You might be redirected to a webpage where you need to acknowledge that you are visiting a site exposed by ngrok. Just select Visit Site to continue.

You should now have access to ngrok’s test game app. Now you know how simple it can be to publicly expose a Kubernetes service.

In my case, this cluster is running locally in my homelab, meaning that I did not have to:
- Open any ports on my firewall
- Configure port forwarding
- Set up reverse proxies
- Create any certificates
As we can see, the endpoint is secured and it has a certificate issued by Let’s Encrypt.


All we had to do was deploy the ngrok ingress controller and an Ingress rule pointing to the backend we wanted to expose.
apiVersion: networking.k8s.io/v1
kind: Ingress
metadata:
 name: game-2048
spec:
 ingressClassName: ngrok
 rules:
   - host: "{{ .spectro.macro.NGROK_DOMAIN }}"
     http:
       paths:
         - path: /
           pathType: Prefix
           backend:
             service:
               name: game-2048
               port:
                 number: 80
Of course, this is the simplest thing we can do. Ngrok provides many other security features, even in its free version, so let’s set up another layer of (free) security.
Add an extra layer of security with OAuth
Ngrok supports many different OAuth providers, like Github, Facebook, LinkedIn, Amazon, Microsoft, Google and more. Let’s add Google OAuth. To do so, we’ll create a new version of our ngrok_addons profile.
Go to Profiles, select your ngrok_addons profile (or whichever name you’ve chosen), hover over the 1.0.0 version and select Create new version from the dropdown menu.

Choose a new version (I’ll go with 1.0.1) and select Confirm.

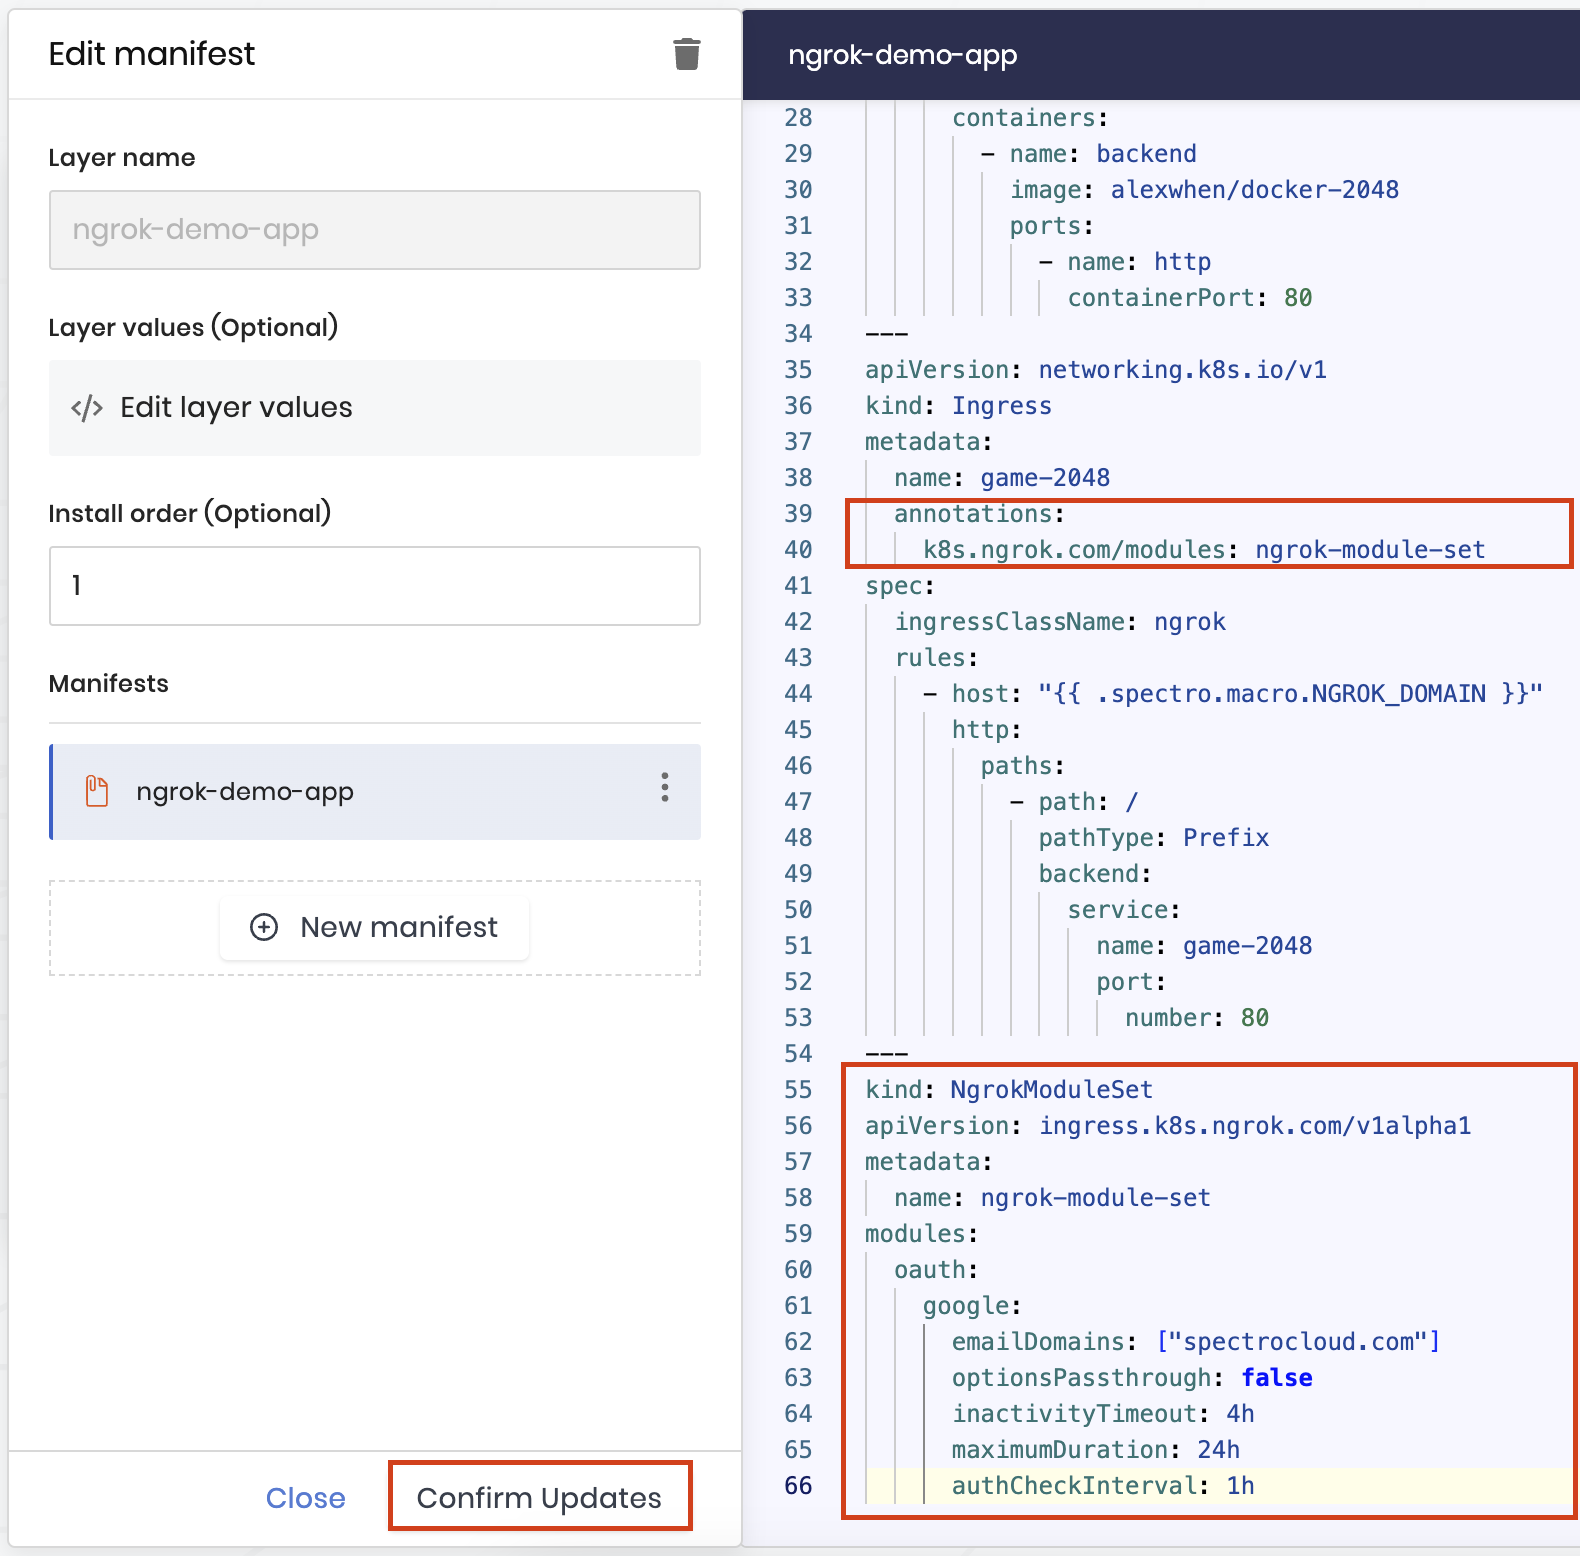
Now select the ngrok-demo-app layer and replace all the contents with the following. Make sure to change or remove the emailDomains field.
apiVersion: v1
kind: Service
metadata:
 name: game-2048
spec:
 ports:
   - name: http
     port: 80
     targetPort: 80
 selector:
   app: game-2048
 type: ClusterIP # Optional, default is ClusterIP
---
apiVersion: apps/v1
kind: Deployment
metadata:
 name: game-2048
spec:
 replicas: 1
 selector:
   matchLabels:
     app: game-2048
 template:
   metadata:  # Corrected indentation
     labels:
       app: game-2048
   spec:
     containers:
       - name: backend
         image: alexwhen/docker-2048
         ports:
           - name: http
             containerPort: 80
---
apiVersion: networking.k8s.io/v1
kind: Ingress
metadata:
 name: game-2048
 annotations:
   k8s.ngrok.com/modules: ngrok-module-set
spec:
 ingressClassName: ngrok
 rules:
   - host: "{{ .spectro.macro.NGROK_DOMAIN }}"
     http:
       paths:
         - path: /
           pathType: Prefix
           backend:
             service:
               name: game-2048
               port:
                 number: 80
---
kind: NgrokModuleSet
apiVersion: ingress.k8s.ngrok.com/v1alpha1
metadata:
 name: ngrok-module-set
modules:
 oauth:
   google:
     emailDomains: ["spectrocloud.com"]
     optionsPassthrough: false
     inactivityTimeout: 4h
     maximumDuration: 24h
     authCheckInterval: 1h
In the manifest you can see that we’ve added an NgrokModuleSet resource and added an annotation to the Ingress definition which points to the ngrok-module-set resource. The NgrokModuleSet CRD allows us to configure resources in ngrok.
In this case, we’re configuring Google OAuth (thus enabling OAuth as well), setting some options and in my case, configuring the spectrocloud.com email domain. This configuration will force users to login with their Google credentials and will only allow users from that email domain to view the application.
When you’re done with the configuration, just hit Confirm Updates.
Select Save Changes.

Go to your cluster’s Profile tab, hover over the 1.0.0 version and when the dropdown opens, select your new version.

You’ll see the status icons of the layers change to grey and you’ll need to select Review & Save to review the changes and apply the new profile version.

The change summary will open and you can select Review changes in Editor.

Make sure to select the layers/manifests on the left to review all changes. If all is well and all items have a checkmark, select Apply Changes.

When the deployment completes, you can check your ngrok dashboard for the new config. You should see that OAuth is now enabled, that google is the selected identity provider and that an email domain is configured (or not, if you removed that).

Let’s try to visit the app again, but you might first need to open an incognito tab to avoid your browser reverting to the previously active session.
In a new (incognito) tab, you should now get prompted to visit the ngrok exposed site again, and to sign in with Google to access the page.
If you’ve removed the email domain, you will still have to login, but there will be no limiting factor. Anyone that logs in will be able to access the page. In my case, only a certain domain has access, so I’ll first try a gmail.com account.

After entering a @gmail.com address, my password and 2-Step Verification, I get the following error:

Now I’ll try it with an @spectrocloud.com address… and it works
That wasn’t that hard right? The “hard” part is going through the first steps to get access to your ngrok info and setting up the Cluster Profile. However, now you can reuse this Cluster Profile and make slight changes to expose any service in your clusters.

Advanced ngrok Features for Kubernetes power users
Custom subdomains and reserved tunnels
With ngrok’s Pro or higher plans, you can assign predictable, branded URLs to your services. This is especially useful when integrating with third-party tools or APIs that require consistent endpoints.

Enhancing security with ngrok IP Policies
Ngrok’s IP policies enhance security by restricting tunnel access to specific IP addresses or ranges. This feature lets you whitelist trusted sources or blacklist unauthorized ones, ensuring sensitive Kubernetes services remain protected.
(The IP in this example is fake, of course. 😜)

Simply attach the IP policies to your edge endpoints and provide an immediate extra layer of security.

Walkthrough video
You can watch a full video walkthrough of all the steps in this blog right here, covering:
- A VMware cluster deployment
- Adding a Helm registry
- Creating Macros
- Creating a cluster profile
- Deploying the ngrok resources
- Creating a new version of the cluster profile
- Deploying the changes
- Adding a simple Google OAuth configuration
- Testing a public and OAuth based app deployment
Conclusion: Simplifying Kubernetes Access with ngrok
Here at Spectro we love how ngrok simplifies exposing Kubernetes services. It saves you from complex ingress configurations, certificate management and doubting if you’ve locked down your firewall correctly.
When paired with Spectro Cloud’s Palette, the combination becomes even more impactful. Palette simplifies Kubernetes lifecycle management, while ngrok provides secure and seamless service access. A true ‘better together’ story for simplification.